Cura Tree Support Settings: PLA Setup and Fixes
Set Cura tree supports for PLA with documented starting values, then tune contact gaps, branch density, and adhesion for cleaner support removal.
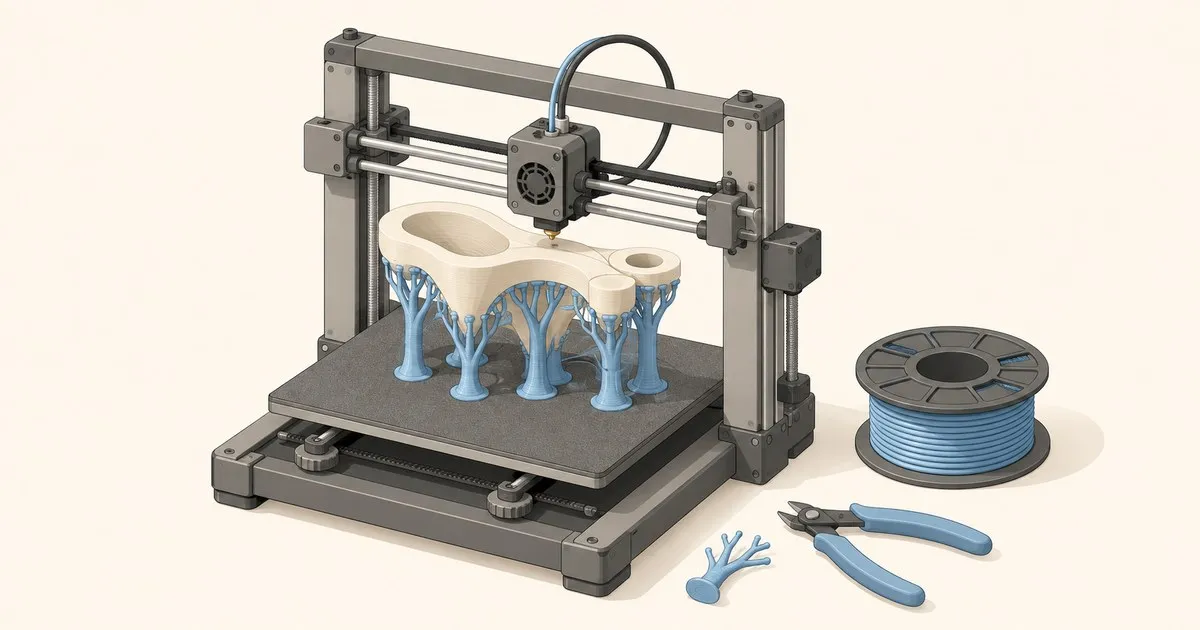
Useful cura tree support settings start with the clearance between support and model. Too little clearance leaves welded contact patches; too much lets the underside sag. Tune that gap before making every branch thicker: the Settings Guide identifies Z distance as the strongest influence on support bonding.
Cura tree support settings for PLA
Enable Generate Support, select Tree under Support Structure, and expose hidden controls through setting visibility. Start with Touching Buildplate and Support Overhang Angle: 50°, UltiMaker’s documented starting recommendation. Lower overhang angles generate support for more surfaces. UltiMaker’s tree-support guide explains placement and previewing.
For a concrete example, use the Ender-3 / Ender-3 v2 Cura printer definition, which inherits the Creality base profile. Select its 0.4 mm nozzle and 50 mm/s print speed, as specified in the Creality base definition, with 0.20 mm layer height from Standard Quality.
For PLA printed with PLA supports, the Generic PLA profile’s Creality entries specify 200°C nozzle, 50°C bed, and 100% print cooling. Keep an already calibrated spool profile if it differs. Verify these starting values with your spool.
Apply these support values, calculated from the Creality profile’s formulas at that layer height and 0.40 mm outer-wall line width:
| Setting | Starting value |
|---|---|
| Support Top Distance | 0.20 mm |
| Support X/Y Distance | 0.80 mm |
| Enable Support Interface / Roof | On |
| Support Roof Thickness | 0.80 mm |
| Support Roof Density | 33.333% |
| Support Interface Pattern | Grid |
| Support Density | 0% |
| Support Brim Width | 4 mm |
For tree geometry, the base support definitions provide 5 mm Branch Diameter, 30% Branch Density with a roof enabled, and 0.80 mm Tip Diameter when support line width is 0.40 mm. These values are a profile-based baseline; installed releases and saved overrides can differ. Newer definitions label the brim control Support Inner Brim Width.
Understand branches, roofs, and placement
Support Density fills the branch interior. Branch Density controls the distribution of tips. Support Roof Density controls the contact platform beneath the part. Hollow branches can therefore coexist with a dense roof. Raising branch density improves coverage but makes removal harder. Cura’s setting definitions distinguish these controls.
A roof is useful when disconnected tips leave an uneven underside: it adds an interface without filling the entire support structure. The tradeoff is stronger attachment during removal. The interface guide explains that balance.
Use trees for scattered overhangs where branches can wrap around the model. Switch placement to Everywhere when a required area cannot be reached from the bed, accepting contact on the model beneath it. For a broad flat shelf, compare Normal and Tree in Preview and inspect interface coverage before choosing. UltiMaker’s placement explanation describes why buildplate-only support sometimes needs relaxing.
Older screenshots can mislead: Cura 5.4 introduced revised trees and additional controls, including separate preferred and maximum branch angles, branch density, and tip diameter. Use the names in your installed release.
Fix welded contacts and rough undersides
Defect: the support breaks apart but leaves its roof bonded to the model. The likely issue is excessive contact bonding. Check Support Top Distance explicitly, including any saved override. If it is below the baseline, restore the table’s gap and retry. If removal still tears the surface, increase clearance incrementally. Hotter extrusion and wider lines also increase bonding, according to the Z-distance guide.
Defect: loose strands or deep grooves under an otherwise complete ledge. Inspect whether the roof exists beneath that surface. If absent, enable it; if present, check excessive clearance before increasing the entire tree’s density. A denser interface can improve the underside while leaving the branch body unchanged. Support interfaces are designed for this separation.
Defect: sidewall scars or missing support near a narrow feature. Inspect Support X/Y Distance and Support Distance Priority together. Increasing horizontal clearance protects sidewalls but can remove support beneath small overhangs. When X/Y overrides Z, the horizontal requirement can also enlarge the effective vertical gap. The X/Y-distance guide illustrates this conflict.
For PETG, repeat the contact-gap test with the actual spool. The Z-distance guidance calls for more separation when materials bond strongly; it does not establish a universal PETG gap.
Fix unstable branches
Defect: a branch leans or breaks before reaching its overhang. Inspect its base and the last intact layers. If a previously reduced Branch Diameter produced a fragile stem, return to the documented baseline before widening it further. Wider branches resist being knocked over, but navigate tight spaces less easily. The branch-diameter guide explains that tradeoff.
Lowering Maximum Branch Angle makes branches more upright and stable, while sacrificing reach. Re-slice after changing it and check for unsupported areas. Cura’s definitions describe this stability-versus-reach tradeoff.
If extrusion is inconsistent on the model as well as the trees, run flow and temperature calibration before continuing support tuning.
How to verify the changes
Print a small support coupon containing a flat ledge and a curved overhang, or a cropped version of the failing geometry. Keep filament, orientation, layer height, and temperature fixed while changing a single support control.
In Preview, follow each branch from its base to its contact area. Then inspect the cooled print for these success criteria:
- Branches remain attached and reach their intended surfaces.
- The supported underside has no hanging loops or missing edges.
- The interface separates without tearing the model’s walls.
Save the Cura project with photographs of the underside, filament manufacturer, and spool batch if available. For an AI camera monitoring collapsed supports, log missed failures and false alarms too; SentryML’s model-monitoring guide explains why detector outcomes need checking against reality.
Sources
- UltiMaker: Tree supports explained
- UltiMaker: Cura 5.4 tree-support changes
- Cura: Ender-3 and Ender-3 v2 definition
- Cura: Creality base profile
- Cura: Creality Standard Quality profile
- UltiMaker: Generic PLA material profile
- Cura: Support setting definitions
- Settings Guide: Support Z Distance
- Settings Guide: Support X/Y Distance
- Settings Guide: Tree Support Branch Diameter
- Settings Guide: Enable Support Interface
Related

Best Print Speed for PLA: Ranges, Limits, How to Push Them
The best print speed for PLA depends on your hotend and nozzle size. Exact mm/s ranges for quality, draft, and fast printing, plus the real flow ceiling.
How to Fix Stringing in Cura: Retraction/Temperature/Travel
Stringing in Cura comes from ooze during travel moves. Fix it with retraction distance, temperature, and combing mode, tuned for direct drive or Bowden.

Cura vs PrusaSlicer: Which One Fits Your Printer?
Cura and PrusaSlicer come from separate codebases, so settings do not map one to one. A translation table, the real gaps, and which one suits your machine.